Sunday, March 31, 2013

Easter Skirts


 It's always fun to wear a new skirt for Easter! We found THE BEST skirt pattern ever. Seriously. And it's not even really a "pattern". We only had to buy 3/4 yard for each skirt! Plus the elastic for the waistband. The skirt is a fast project...how does 15 minutes sound?


The two skirts are slightly different. The polka dot skirt has only one seam, whereas we had to cut the directional chevron print into two pieces, creating two seams. Can't say which one is better...luckily for us, we are the same size, so we can share them :)


Saturday, March 30, 2013

How to Cut Fabric Using a Rotary Cutter


Cutting fabric can be scary, but with these simple tips, you'll be just fine...promise :) Just grab your rotary cutter, ruler, and rotary mat, and we'll get started!


A little note about rotary cutting supplies. First of all, we highly recommend that you purchase the gypsy gripper which suctions to your ruler and provides a handle for easy cutting.  This makes cutting safer and you can apply pressure more easily.


Also, another thing to consider is where to place your rotary mat while cutting. We don't have a table and so we prefer cutting on the ground.  We place a hard piece of wood under our mats so that the surface is stable.  The important thing to remember is to ALWAYS cut on a flat, hard surface.


We learned the hard way that you ALWAYS use your rotary mat on a hard surface...not carpet ;) This is just one of many holes in our well loved mats.


As far as the actual rotary cutter goes, we have a Fiskars brand that works great. Make sure to change your blade out when it gets dull. A fresh blade always gives a nicer cut. 


And lastly, remember to put your safety protector on your blade to avoid accidents. We know all about those :)


Now, let's begin cutting! The picture above shows fabric that just came from the fabric store.  Nothing is matched up yet, that is our next step.


In order to get a nice cut across the grain of fabric, line up your selvages.  If you just thought to yourself "what's a selvage?" just smile and nod. Oh, or we can tell you :) The selvage is the edge of the fabric, opposite of the grain, that it tightly woven to reduce fraying. Usually the selvages can be determined by a white band of words on the edge, as seen above. 


After lining up your selvages, your edge running along the grain of the fabric will probably be uneven. That's okay...we'll fix that in a minute :)


Line up the folded edge of your fabric with a line on your rotary mat, as shown above. This will ensure that your fabric is cut straight.


Grab your rotary ruler and line up the edge of the ruler as close as you can to the uneven edge of your fabric. Make sure to line up the lines of your ruler with the lines on your mat...this way you will cut at a 90 degree angle.

Apply pressure on your ruler with your left hand, and with your right hand, cut the fabric.  Obviously if you are left handed, you will want to use the opposite hands. Apply enough pressure to go through all the layers, but don't press so hard your hand hurts. We are little cheaters and like to cut through a lot of layers at a time. Our record? Hmm...too many layers to count. Do as we say and not as we do and cut through no more than about 5 layers of fabric at a time.


Tada! Your fabric should now be squared up!


For making strips, count the number of inches on your mat for what size of strip you need. (We are cutting a 5" strip.) Then line the edge of your ruler with your selected line on your mat. You may also use the inch marks on your ruler for cutting strips that are smaller than the width of your ruler.


Thanks for quilting with us today! Hope this helps :)

Saturday, March 23, 2013

Tutorial: Raw Edge Circle Quilt


We know you've probably seen a bazillion raw-edge circle tutorials before, but we thought we would share our version with you today :) It is a very simple quilt, so buckle up and get ready! Finished quilt measures 63" x 84".

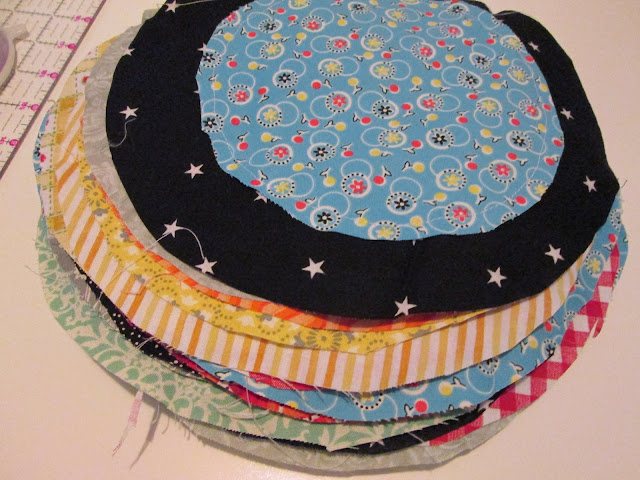
  1.  The first step is to choose out fabrics. All of our fabrics came from our scrap bin. This quilt looks best when a variety of fabrics are used...we probably used 20 different prints.  You will need fabric scraps at least 10" square for the outside circles and 7" for the inside circles.  For the generous lap size we made (63" x 84") you will need 48 centers and 48 outside circles.

2.  Find two bowls or other circular objects to trace. Our big  bowl had a 9" diameter, and our small bowl measured 6". Trace the outer edge of your bowl on the wrong side of your fabric. Remember you need 48 big circles and 48 small circles.


3. Cut out your circles with scissors. This is a scrappy quilt so the circles don't have to be perfect.


4. Cut out 48- 11" white background squares.


5. Choose two circles, one large and one small. Center the smaller circle in the middle of your large circle. Pin if desired.


6.  Using a 1/4" seam allowance,  sew around the small circle, tacking it to the larger circle.


7. Make sure you back stitch. 


8. Lay your layered circle on top of an 11" white square. Pin.


 9. Using a 1/4" seam allowance, sew your layered circle to tack to the white square.


10.  You have 1 block finished!


11. Repeat steps 5-10 to create 48 total blocks.
 

12. Sew your blocks together in 8 rows of 6 blocks each.  Now your quilt top is complete! After finishing and washing the quilt, your circles will fray and give the quilt a scrappy vintage look. Enjoy!

Saturday, March 16, 2013

Lime Ricki


Hello again! This is our second time blogging today, but we REALLY couldn't wait! We just finished making a new pattern called Lime Ricki. We're trying to act calm...is it working? Cause we're totally freaking out :) This pattern uses fat quarters or 1/4 yards and comes together quickly...perfect for a beginner who can match up seams.

Choosing out the color scheme was really fun for this quilt. We started with the lime color and added some true reds and blues. The small scale prints work well with the pattern.


We like being adventurous when it comes to machine quilting. We decided on quilting each Lime Ricki with a spiral. It's easier than it looks...promise :)

 
Did we mention that we love this quilt? We do.


 You can buy this pattern in PDF form here. The cover quilt is also listed in the shop...so hurry before we decide to take it off and keep it for ourselves :) No promises that it will be there tomorrow. Very tempting...

Spring Quilt


Remember  this quilt?  Yeah,  we forgot about it too :) That's the problem with having a messy sewing closet...you never can find anything! The funny thing is that all it needed after a few months of sitting was about 2 hours of quilting.


Loving the machine quilting...BIG TIME. The loopy flowers are so doodly that you don't have to worry about making them perfect...because we all know that there's no such thing as perfect machine quilting :)


 The birdies and flowers on this quilt are just in time for Spring. This week it's been 70 degrees every day...perfect!


We're looking forward to making more bright quilts...because those are the only kind we make when the sun is shining ;) 


This one's for sale  in the shop...come stop by!

Tuesday, March 12, 2013

Right Now


 **We've been digging ourselves out of our sewing room. LITERALLY. We are famous for leaving a huge mess after a long day of sewing.  Now we can actually see the floor, and we are crossing our fingers that it will stay clean for at least five minutes :)


**Today we've also been clipping strings off secret projects...more to come!

 **So naturally we've been covered in strings. The problems of being a quilter :)

**So now we need all the fresh air we can get (because we're drowning in projects) and are headed outside for sunshine, 50 degree weather, and a walk. Oh, and also to take quilt pictures...because this walk actually has to have a purpose :)

Saturday, March 9, 2013

Spin Blossoms


This quilt was going to be  in our etsy shop... that was before we finished it :)  After we finished it, we changed our minds and decided that we might just need it... there's always room for one more quilt. Always.


We found the Spin Blossoms pattern via Pinterest and tweaked it so that the blocks could be slightly larger.  The quilt ended up being about 55" X 70"...which is perfect for a throw quilt.


Loopdy-loop machine quilting looks fab on this quilt... it's super crinkly. Since the blocks are angular, we wanted to do swirly machine quilting to soften the sharp turns. Yes, there is a science to choosing machine quilting :)


After finishing this whole quilt...binding and all...we noticed a small cut in our quilt! Must. Be. More. Careful. Squaring. Up. At least that's how we think it happened. It's all bandaged up now, and its our little secret :)


 We ended up doing standard Quackadoodle Quilt colors, but then threw in a minty green. LOVE. That coral color has got to be one of our favorite colors right now too.


We are really into solids at this point. We used to be anti-solid girls, but quickly converted :)


 The binding is machine bound, again. It is so much quicker and we zipped the binding on in no time at all!


We can tell that this quilt will get a lot of use this Summer. Spring.  Oh yeah, maybe it's still Winter :)

LinkWithin

Related Posts Plugin for WordPress, Blogger...