Wednesday, May 29, 2013

Catching Up

Since we have a break to catch you up on a few things, we thought we'd fill you in:


*We planted 350(!) flowers this weekend.


*And we found the best coral spray paint ever. Seriously.


*So...we spray painted our boring brown lamps and gave them a refreshing new coat.


*And last, but DEFINITELY not least...we made an emergency run to the fabric store to buy fabric. Ok. Maybe it really was an emergency ;)

Tuesday, May 28, 2013

Tutorial: Ribbon Valence


It's been a while since we've had a "real" blog post around here, so here's an easy tutorial that we whipped together. Shoot us an email with any questions. Now let's begin!


First, measure your curtain rod/window to get an idea of how much fabric to buy. Add an extra two inches (1 inch per side) to the length of your curtain rod and you'll be good to go for the width of the valence. For the length of your valence we just used the WOF (44"), but your length depends on how big your window is and how far you want the valence to hang down.


Next, it's time to hem your raw edges. On all four sides, iron 1/2" and then another 1/2" to give your edge a nice finish.


Sew around all four sides, as close to the edge as possible. Remember to backstitch.


Now all four sides of your valence should have nice finished hems.


Then, sew the rod pocket. Measure the circumference of your curtain rod to figure out how big to make the pocket. Iron down the desired length...make sure you are ironing on the correct side (the width, not the length).


Sew as close to the edge as possible to finish off your rod pocket.


Now you are all finished with the hemming and rod pockets!


The next step is super simple. Hang up your valence and decide how long you want the main part of it to hang and where you want the ribbons to be placed. Basically just eyeball  an imaginary line and use your fingers to hold your spot.


Cut along the imaginary line you just barely created the whole way across your valence, making two separate pieces.


The next step is to add ribbons. You need to measure your valence and split it evenly into thirds (the above picture is pre-measuring!). Between each third, place one long ribbon (Make sure your ribbons are approximately 20" longer than your valence.) Fold each ribbon in half and leave one half hanging down the front of the valence, and the other half hanging down the back.


Here's a better close-up of how to place the ribbons. Then, match the top half of your valence right-sides-together with the bottom half of your valence, pinning the ribbons in place. You are now creating a seam which will make your valence into one piece.


Sew a 1/2" seam allowance.


If you did it right, your valence should look like the above picture. ^


Now just tie the ribbons into bows and you made a ribbon valence!

Wednesday, May 22, 2013

News


Do you want the good news or the bad news first?


The good news is that we've been quilting like crazy. With a capital "C".


The bad news is that we have nothing to blog about! Well not nothing (this counts as a blog post, right?). As soon as we  have some finish-ups we will give you the news. For now, just assume that no news (or no blogging) is good news :)

Oh, and by the way that straw is amazing. It makes your water super cold. It's a good thing too because it is hot. hot. hot.

Saturday, May 18, 2013

Things


Thought we'd show you a sneak-peak of our newbie pattern! Loving the colors on this one. More to come...


Also, couldn't resist showing you this napkin pillow that we forgot to blog about. Whoops! Just a year late :)


Been cleaning out our sewing spaces today. Those pesky little triangles are in every nook and cranny. We pulled out the big guns (aka the shop vac and vacuum) and cleaned up.


While we were cleaning up we found 2 seam rippers that have been M.I.A. for a few months now. Hallelujah! We should clean up more often :)


We'd better scoot because we have some projects that need finished. STAT!

Thursday, May 16, 2013

Circles


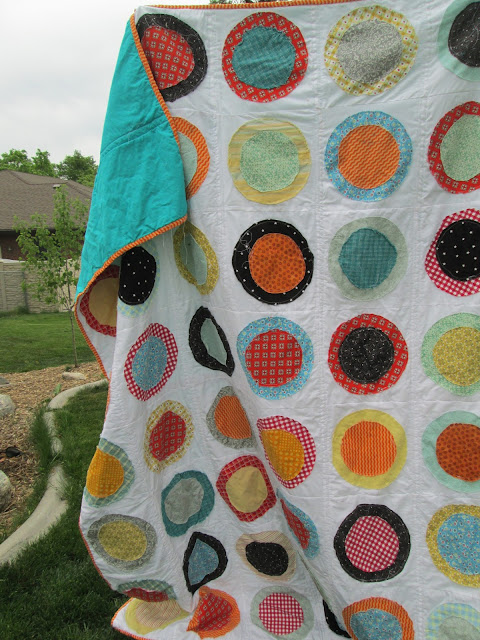
This quilt has vintage written all over it. Once in a blue moon a scrap quilt actually turns out better than we expect it to. Hate to admit it, but we get sick of fabric if its been around too long. Bleh. Don't know about you but there are some fabrics that never seem to run out no matter how many times you use them. And they're not the cute fabrics either. Not that we are complaining about this quilt, it's just nice to finally have a use for those fabrics.    

It's been ages since we have took pictures outside. Nobody wants to see dead grass and patches of ice in the background of a cute photo. Also, snow + clumsy arms = dirty quilts. It was fun to go barefoot and incorporate the green scenery in our photos.


Twin sized quilts are perfect for twin sewers :) With twice as many hands, the quilt gets finished in half as much time.


The binding fabric is actually a chevron print, but after 2 binding folds it looks like we did a stripey bias binding. Now that is the cheater's way :)


Sorry for the picture overload. We are kinda obsessed.


After one wash the raw-edges are frayed and it gives the quilt a well-loved look


The teal back we got for a REALLY good deal. Really good as in 8-yards-for-5-dollars-good. You better be jealous. We have our ways :)   


 If you want to make your own raw-edge circle quilt you can find our free tutorial here. 


As always, you can purchase this quilt on Etsy.

Friday, May 3, 2013

Up and Running


We finally got the computer up and running after two weeks. For heaven sakes. In between fixing that, we've  shipped off 3 Etsy quilts and sent off 2 patterns (hooray!). 


The back-stitch button is a perfect reminder of how we've been "in reverse" this week...meaning we had to dust of this button before taking the picture. Life's been busy.


We've been doing a lot of Gingher action this week. We would hate to have any strings on a handmade quilt. Ha. That's impossible.


At least our rotary cutters got some use this week when cutting out fabric ribbons for wrapping quilts:


And of course we had to include this picture of red scissors. They even match the quilt. Red scissors work better than black scissors. But don't tell anyone that :)


Here's to a more productive sewing week: fabric splurging, quilt pattern designing, and actually using our machines. What have you been up to the last two weeks?

Thursday, May 2, 2013

Napkin Pillow Tutorial


This is an easy pillow tutorial that takes 10 minutes to make and costs under $5...the best kind of project. Ready. Set. Go!

Materials Needed:
2 napkins, any size (our napkins measured 19" x 19")
Thread to match the napkins
Pins
Down Pillow Form, about the size of your napkins (ours measured 22" x 22")


First of all...Have you ever looked for kitchen napkins? If you haven't, you're missing out. This has got be one of the best kept secrets in the sewing world. Napkins come in a variety of cute patterns at reasonable costs. Usually they cost about $5- $10 for a pack of four, but we scored and found a set of four napkins on sale for $2.99! (Thank you Target!)


Napkins already have a hem around the edge and this makes sewing with them SUPER easy. Okay let's start...


Find your pins and start pinning! Match your 2 napkins WRONG sides together. Pin around three sides:


Sew the three pinned sides of your napkin as close to the edge as you can, but be careful when you sew so you don't get holes :)


This is an up-close shot of what the edge of your pillow will look like after sewing.


Shove your down pillow-form into the open end of the sewn napkins. Make sure you shove it down hard so you still have room to sew:


Pin the fourth side of your napkins and sew as close to the edge of the fabric as you can.


Pat your self on the back for making this quick little pillow!

LinkWithin

Related Posts Plugin for WordPress, Blogger...